

Promised, somewhat delayed & now posted, more technical details for relief printing on very large blocks with a road roller. Why you would ever want to, especially if there was perfectly good stone litho press nearby, I won't try to explain.
To begin, most people who organize these events refer to the pressing vehicle as a steamroller, but I doubt anyone has used an actual steam-powered roller to make prints. They use a road roller (i.e. diesel powered).
Last August, "big print" events were held in Vancouver and Seattle. The Vancouver event was organized by Peter Braune, artist Richard Tetrault and the mob at New Leaf Editions on Granville Island. Drawing on his contacts in the local arts community, he recruited a 11 artists to participate, including two international participants in the current Vancouver Biennale. Each contributed $300 toward materials, with a standard commission agreement for the sale of the resulting prints.

The artists worked on a 4-by-8 foot sheet of 1-inch high-density fibre board. Technically, each of the resulting blocks was a woodcut. A variety of tools - whatever was required - were used to cut the blocks, including wood chisels, trim routers, mat knives and wood grinders.
The blocks were printed on both paper (Stonehenge, because it was available in 100-ft rolls wide enough to accommodate the blocks) and a hemp-cotton cloth.
The printing was to have been done with a 60-inch-wide double drum road roller: being wider than the blocks would ensure complete compression along the edges of the block, and the weight (compared to a smaller machine) would aid impression. Also, the rear drum would allow the printer to drive straight across the blocks just once to print a block.
Unfortunately the equipment supplier had a mechanical problem with the promised 60-inch machine, and a smaller 50-inch single-drum version was supplied. This allowed for almost no lateral error when aligning the drum to the block. The single drum also meant the machine had to be driven over the block, and then reversed so it would be in position for the next block. (The double-drum machine could have been driven across a block to make an impression, then simple reversed for the next.)

The blocks were inked with rubber-based letterpress ink, which proved a poor choice for printing on the cloth; it took ages to dry. Peter says next time he'd use Gamblin relief ink. A number of very large lithograph hand rollers were used, with two or three people inking a block ("Once you know the sound of a roller on a full block, you know when to print," Peter says.)
For the bed of what would be the printing area, they needed a smooth, flat and level area of pavement. Some kind of system is needed for registering the blocks; chalk marks on the pavement can work. A trip of plywood cut with a bevel along the 4-foot dimension was placed on the ground, parallel to the roller. This acted as a ramp, raising the roller to the block's face, rather than bang into the edge and possibly push the block along the ground, or (worse!) crush that edge of the block.
A thin press blanket was placed on the ground, to minimize irregularities in the ground. The block was then placed on the blanket, and the paper or cloth laid down: two people held one of the short ends while two others positioned the opposite end around the edge of the block nearest to the roller, and held it in place. The two helpers then gentle lowered the material on to the inked block.

As shown above, the back of the paper or cloth was covered with a rubber blanket (any heavy-duty smooth underflooring material would work) & a press blanket (the "packing"), and then a thin (1/8-inch) sheet of MDF (the "tympan"). The rubber blanket was subsequently moved to above the MDF sheet because it had a seam down the middle that was affecting the impression. Ideally it would have stayed below the tympan.
The roller was fired up, driven very slowly across the block, and then reversed back. The paper or cloth was then inspected while still on the block, and if any areas (i.e. along the outer edges) looked to have not been completely printed, they were rubbed with spoons.

The sheet was then lifted off by two people starting at one end, gently walking back to left it off the plate. Because the sheets were more than 8 feet tall, small step ladders were required at the far end to allow them to lift the sheet off the block, or a third person held the edge like a bride's train as the other two finished removing the sheet.

Peter's inaugural Big Printing event was a success. They hope to repeat it next year, taking advantage of a few lessons learned:
- The cloth they used was too coarse for printing on; use a finer weave.
- Have a system, and lots of space, for drying the prints.
- Make sure your rubber blanket is one continuous piece larger than the blocks, without any seams in it!
- The event drew a steady crowd all day, with lots of interest in buying the prints.Have a plan for selling the prints as they're being printed. This means have a single person whose only job is to deal with the public, answer questions, and take money. (This also leaves the other members of the team free to focus on their tasks).
- Don't underestimate how much physical labor is required. It was a very hot day: hats to prevent sunstroke, and canopy tents to work under while inking etc. were required.
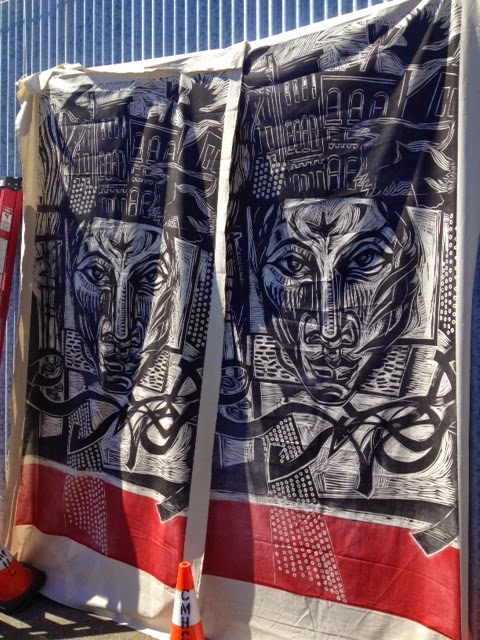
All of the blocks were printed twice on cloth and twice on paper, for a total of four prints. The artists kept one of each, and the printing team kept the others to offer for sale. These are being included in an upcoming auction at the Waterfront Theatre on Granville Island on September 27 (5 - 9 p.m.) to benefit C3 (Creative Cultural Collaborations Society) and SCWOP (Society of Contemporary Works on Paper).
Participating artist Richard Tetrault's site has some more images from the two-day event. Apparently there also are a bunch of photos on various facebook pages, but you're on your own finding those. HM don't do facebook.
MEANWHILE, IN SEATTLE
About a week after Vancouver's Big Printing, Seattle's School of Visual Concepts held its annual Wayzgoose and Steamroller Smackdown. They've been printing with road rollers for a number of years now. I didn't get to this year's event, but a colleague who did sent the following images, form which we can deduce some of their technique.
First, instead of wood they used pieces of lino approximately 2-by-3 feet (that might be big in Seattle, but in Vancouver....). Lino might make for easier cutting, but it also makes for a much less robust matrix. Looks like a can of Van Son rubber-based ink in the shot below (and they used those horrible, cheap & tiny Speedball rollers to ink the blocks!).

They laid a sheet of plywood over the blocks - no details on how they built up the "bed" beneath. But they also used the road roller equivalent of a Kelsey 5x3 tabletop press to do the printing (even if it was a double roller).
The Flickr set on the event's home page offers lots of images of the process. In summary, it looks like they laid a sheet of plywood on the pavement to act as a bed. The inked linos were placed on this, then the paper placed down, then what appears to be a piece of cheap artificial grass laid down, and finally another sheet of plywood to act as a tympan. Why they would use the fake grass, which would have been a terribly uneven and squishy surface against which to press the paper, I cannot explain.
Looks like one guy stands on the plywood to keep it from shifting while the roller passes across.

So that's the tale of two cities making big prints.
AND ANOTHER THING
Back in Vancouver, New Leaf's had a busy month: the binanual juried mini-print show, BIMPE, they organize opened last week. Check it out if you get a chance. It's a great opportunity to see some fantastic printmaking from around the world, and buy prints at very reasonable prices. The show will also be stopping in Kelowna and Edmonton.
